|
This article is in need of some cleanup. Look into spelling, grammar and formatting. |
Over the course of Madness Retaliation, you'll find some unique bosses amid the hordes of generic enemies. These powerful foes tend to guard items imperative to your mission, and you'll have to figure out a way past them before you can complete your assigned task. They're generally armed with a few extra tricks compared to normal foes, so knowing what they'll do could mean the difference between victory and defeat.
Boss 1: The Savior
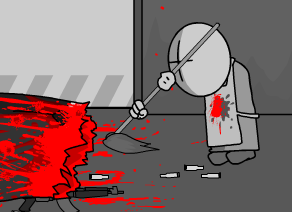
This is your first true boss battle, and it can be quite difficult if you aren't prepared. Armor piercing weapons are a must, especially the Steyr AUG rifle you hopefully picked up along the way here; Jesus has an Armor Class of 8, allowing him to negate about two-thirds of your attacks. He also has a group of minions in both phases of the fight; if you deplete Jesus' health (18 HP), he will vaporize one of his companions and add their HP to his own.
There are two phases to the battle, with distinct tactics and strategies for each one.
Phase 1
Initially, Jesus wields the 316 Sword, giving him massive power and the ability to cut right through armor. Luckily, it only has a range of 2 spaces, and the AP Cost of 3 will greatly limit the number of attacks he can perform in a turn, especially since he starts the battle near the back of the room. His entourage consists of five basic 1337 agents (5 HP, AC 2): two at the back of the room, armed with MAC-10 SMGs; two carrying Desert Eagles, standing a little bit in front of Jesus; and one with a Mossberg 500 at the front of the formation.
Your first order of business should be taking down the Agents; a single shotgun blast can take out the entire front of the formation (assuming none of them block), and an SMG (preferably a MAC-10 of your own, wielded by the Assault character) can do the same to the goons at the back of the room. Once it's just you and the Savior, keep your distance while whittling away at his HP - even if you've used all your AP for armor-piercing weapons, a few regular attacks should break through his guard (eventually).
However, you should also try to gauge how far Jesus can move on his turn and then keep your characters out of his range - they'll be safe as long as he is left with less than 3 AP when he gets into attack range. If you really can't avoid him, use your highest-HP character to draw his fire - the Savior will only be able to make one attack, so you can heal off the damage if your toughest character has more than 12 HP when Jesus' turn rolls around.
Phase 2
When Jesus' HP is depleted, he pulls out a S&W 500 pistol and retreats to the back of the room. He revives his entourage as zombies, each with 6 HP and an Armor Class of 1, and clustered together in the middle of the room. Since this all happens the moment you deplete Jesus' HP, your characters will not have a chance to regenerate AP - if you're low, a Smoke Grenade or Flashbang will help you survive the initial assault.
The zombies are fairly easy to deal with; a shotgun blast or two will probably defeat the majority, and your other guns can pick off the survivors. However, Jesus is now a much greater threat; his revolver may have only a third of his sword's power, but it gives the Savior decent range and several attacks per turn (it costs 1 AP per attack, thanks to Jesus' CQB class) without sacrificing its armor-piercing ability.
Fortunately, Jesus only has 10 HP this time around, so two hits from the Steyr AUG will be enough to finish him. Since he'll be able to attack you from a distance, your best option is to go all-out on him once the zombies are dealt with; any grenades you may have left are highly effective at forcing an opening for the offensive.
When Jesus' health is depleted for good, you'll get his halo, which doubles your HP (including HP bonuses received from equipment) and allows you to prevent enemies from respawning in rooms you've already cleared. You'll also gain access to a locker containing a 316 Sword, the S&W pistol, and the Level 2 Keycard.
Glitches
On very rare occassions, if you ignore Jesus until his entire entourage is dead, the game may glitch and give you the halo after depleting his HP the first time, despite still reviving the agents.
Boss 2: 4 Mag Zombies
The Level 3 Keycard is in an unguarded room, but prepare for a nasty surprise when you actually grab the item - without warning, a quartet of Mag zombies will drop from above, surrounding your characters and forcing a battle. Each Mag zombie has 64 HP, an Armor Class of 2, and 6 AP, along with the standard zombie claws and "Bloodlust" ability. There are two on either side of your party, with the lower zombie being a little further away.
The biggest issue in this fight is your positioning - all four zombies are in melee range, and two of them are near your Heavy and Assault characters, who tend to be built for AP and power, not HP and Armor. In a straight fight, it's highly unlikely that you'll come out on top - fortunately, you'll have JHP Ammo on your side (if you bothered to find it). This is the key to winning the fight - preventing all four zombies from attacking on their turn.
Your first move should be having your Assault character opening fire on the two Mag zombies on the right side of the screen (if any other characters have SMGs equipped, using them would be a good idea despite the higher AP cost). Immediately after a zombie is stunned, move on to the next - the Heckler & Koch is useful in this regard, due to its longer range, but the MAC-10 is perfectly serviceable and enjoys a slightly higher damage output to speed the zombies' demise. Any characters without SMGs should attack the nearest zombie, focusing fire when possible.
It's possible that you won't be able to stun all four zombies with your SMGs (usually because they managed some lucky blocks). In this case, your first option should be trying to do as much damage as possible to the unstunned zombies, then assessing how many enemies will still be active on their turn. If three or four are still unstunned, a Flashbang will neutralize them; for one or two, a Smoke Grenade will usually be more efficient. As you wear the zombies down, the battle becomes easier - continue to stun the healthy foes and finish off the weakened ones.
If JHP Ammo is not available, your strategy should be focused on taking down individual zombies as quickly as possible. By now, you should have a decent supply of grenades, so your tactics boil down to "attack zombie with most powerful weapons and drop a grenade at the end of the turn". In general, focus on AP and HP over armor - the Mag zombies will be halving your block percentages with their attacks, so you want to focus more on direct survival and offensive power. Keep an eye on your characters' HP and have Medkits (hopefully with the Super Medkit attachment) ready; if a Mag zombie kills one of your specialists, the "Bloodlust"-induced AP regeneration will usually be enough to wreck any strategies you may have.
Unfortunately, the Level 3 Keycard is the only spoil of this battle. However, with it in your possession, you will have access to some very useful equipment in the facility, as well as a few other surprises...
Boss 3: The Clown
The final keycard is hidden in the depths of Club M, a twisted dance club crawling with clowns - and it's only fitting that the boss of this area is Tricky, the biggest, baddest clown of them all. Be prepared for a difficult fight; Tricky has the Portable Improbability Drive in his possession, allowing him to warp reality at will.
Tricky's Weapons and Abilities
Unlike every other enemy in the game, Tricky doesn't have a personal HP value - instead, you must look at the large screen sitting at the back of the room. A bar marked "ENERGY" gradually depletes as Tricky takes damage - when the bar is emptied, the clown will fall.
Emptying the bar, however, is easier said than done; whenever you strike him, Tricky says "LOL!" (or "OUCH!" if you hit him with a melee weapon) and rams his attacker with a train. Luckily, this does not damage the victim, but it does teleport them to a random part of the room and drops a group of clowns that automatically explode at the end of their turn (Tricky is immune to their explosions, by the way). The train also kicks up a massive amount of dust, effectively acting as a smoke grenade and preventing your characters from racking up consecutive hits.
Apart from his odd tricks, however, Tricky's only defensive asset is his high HP - he can take multiple hits from the game's strongest weapons before succumbing. He has no AC or special AP bonuses to speak of, and - despite being both a zombie and a clown - lacks the signature abilities of either class (so you won't have to worry about him blowing up on death or regaining all his AP when he kills someone with a melee attack).
On the offensive side of things, Tricky has the "Bouncy" bonus, allowing him to jump anywhere in his current movement range for only 1 AP (you can do something similar when you find "Tricky's Head" in a hidden locker). He wields three different weapons, switching between them after a jump or using his train attack:
- His signature Warning Sign, a melee weapon with 8 damage, 3 spaces of range, and a 2 AP cost to use.
- A Sawed-off shotgun, with similar attributes to the Warning Sign, but trading the armor-halving effect for hitting everything in a 2 x 3 space around the target.
- An M60 machine gun, with 16 damage, 5 range, and a 2 AP cost.
All of Tricky's weapons can hit everyone in their range simultaneously, so you'll want to keep your characters spaced out when possible. Vertical movement is integral to reducing the number of targets Tricky can hit in one attack, and also for tricking the mad clown into hurting his minions while attacking your team.
Strategy
Initially, Tricky wields his Warning Sign and stands at the opposite end of the room from your team. He is accompanied by four TAC Agents wearing "TAC Masks" and "Assault Armor"; two armed with Mossberg 500 shotguns stand near the middle of the room, and the others wield Bren guns from the column behind their allies.
Your first objective should be picking off the minions - their Armor Class of 3 can lead to some irritating blocks, but you've seen far worse if you've come this far. Ignore Tricky until all of his goons are dead; if any survive the initial round of attacks, you'll probably want to drop a Smoke Grenade or flashbang to reduce the damage they'll deal in return.
When Tricky is alone, attack with your absolute strongest weapon (hopefully the Bren Gun or the 316 Sword); if necessary, use more smoke grenades to get your characters in position to strike. If you're extremely lucky, Tricky might not counterattack - hitting him with a weaker weapon seems to be the best way to do this - but don't expect it to happen often, if at all. When the train inevitably charges through the room, move your characters as far away from the clowns as possible and drop a Flashbang to stun all of your enemies at once, including Tricky. If all goes well, you can repeat the process until Tricky falls.
The biggest hitches you'll find with this strategy (aside from running out of Flashbangs) is the possibility of your attacker going down, either due to an errant clown explosion, a lucky shot from an enemy, or being stunned by a Disco Clown's explosion. This can be mitigated somewhat if you spread powerful weapons throughout your team, and Smoke Grenades are a viable option if no Psycho Clowns or Zombie Clowns are present (or if anyone in range of their explosion will be able to survive the blast). If you're feeling a little risky, you can save a few Flashbangs by using Smoke Grenades - or no grenades at all - when Tricky's "ENERGY" bar gets low, instead relying on your remaining HP and weapon power to finish off the clown. All in all, it's an incredibly tough fight, so be prepared to burn through a lot of items.
When Tricky finally succumbs, you'll get the Portable Improbability Drive, which gains charges (up to 30) from battles and can perform a variety of interesting effects - most pertinent for you will be the ability to revive your fallen characters at the beginning of your turn at the cost of one charge. You also gain access to the locker in the adjacent room, which contains a Warning Sign and M60 for your own use, as well as the Level 4 Keycard.
Final Boss: The Auditor
The final obstacle between you and the DNA Vials is the sinister, shadowy Auditor, who commands hordes of enemies and strange effects thanks to his Improbability Drive. See here for an in-depth look at the elements of this grand melee.